

The forensic image under examination was provided by Dr. Ali Hadi and originally presented during his OSDFCon 2019 workshop. The image acquisition files are available via the download link on his website.

The first step in any digital forensic examination is to identify the format of the acquired image. This is accomplished using the file command, which performs a series of signature-based tests to determine the file type.

Execution of the file command against the provided images confirmed they are in the EWF (Expert Witness Format / EnCase) container format. Forensic analysis on Linux platforms typically requires raw disk images, as many native tools and commands do not directly support specialized forensic formats such as E01, AFF, or split raw images. To obtain a raw representation of the EWF image, the ewfmount utility from the libewf package was employed. This tool exposes a read-only raw logical image (ewf1) within the mounted directory as seen below. If you list the content of the /mnt/evidence/master directory, you should see a file named ewf1. The file is strictly read-only. Similar raw representations were mounted for the associated slave images in their respective directories - /mnt/evidence/slave1 and /mnt/evidence/slave2.

With a raw view of the evidence now accessible, the examination can proceed. The next critical phase involves collecting essential metadata and characteristics of the forensic image to inform subsequent analysis steps.

The volume of forensic interest, highlighted in the partition layout above, begins at sector 2048. Analysis using The Sleuth Kit’s mmls command confirms this is a Linux partition (ext4 or similar filesystem). Repeating the mmls analysis on the slave1 image yields a comparable partition table, with the volume of interest again starting at sector 2048 and identified as a Linux partition.

The same command executed against the slave2 image produces consistent results, with the target volume highlighted and confirmed to begin at sector 2048, also formatted as a Linux partition. The consistent alignment of the primary volume across the master and both slave images at sector 2048 provides strong validation of the acquired evidence integrity and establishes a reliable starting point for deeper filesystem analysis.

To further characterize the filesystems before detailed analysis, filesystem statistics were collected for each image using The Sleuth Kit’s fsstat utility. Execution of the same command against the slave1 and slave2 images produced consistent and corroborative output.

Repeating the same command for the slave files reveals the following information.

The next critical step is to mount the identified Linux partitions containing the data of evidentiary value. This enables the use of standard Linux command-line tools for efficient navigation, artifact discovery, and extraction.

Mounting the slave1 image.

Mounting the Slave2 image.

Forensic Analysis Of The HDFS Cluster
The initial phase of the examination focused on comprehensive system enumeration to establish the operating environment and baseline configuration of the systems under investigation.

Analysis of the master server revealed an Ubuntu Linux 16.04.3 LTS operating system (codename Xenial Xerus). Accurate identification of the OS version and its default time zone is essential in digital forensics, as Linux log files, filesystem metadata, and other critical artifacts store timestamps in the system’s local time zone. Misalignment in time zone interpretation can lead to significant errors during timeline reconstruction.

Hostname information was collected for the master and both slave nodes to support infrastructure mapping and correlation across the HDFS cluster.

Network interface configurations were examined on the master server. Repeating the analysis on the slave nodes yielded identical network settings, indicating standardized deployment across the cluster.

The /etc/hosts file was reviewed to identify any statically defined hostname-to-IP mappings, which can reveal internal naming conventions, cluster node relationships, or adversary-introduced persistence mechanisms.

To determine the original installation date and time of the operating system—a key artifact for establishing the system’s age and potential exposure window—the dumpe2fs utility was employed. This involved first identifying the device name corresponding to the root (/) partition, followed by extraction of the superblock and block group information to retrieve the filesystem creation timestamp.

A critical step in any digital forensic investigation is the identification of all registered user accounts on the system. This is achieved by examining the /etc/passwd file, which serves as the primary database of user information in Linux systems.
This file contains key details for each account, including:
- Username
- User ID (UID)
- Group ID (GID)
- Home directory
- Default login shell
Analysis of the /etc/passwd file on the master node revealed the following user accounts:

From the /etc/passwd enumeration, the accounts root and hadoop were configured with the Bash shell (/bin/bash) on the master node. These two accounts were prioritized for deeper investigation due to their elevated privileges and interactive shell access. Repeating the analysis on the slave nodes, while focusing on accounts with configured interactive shells, produced the following results.

This structured enumeration helps establish legitimate users versus potential rogue or backdoored accounts created by threat actors. It also provides essential context for correlating user activity across authentication logs, shell history, and HDFS access records.
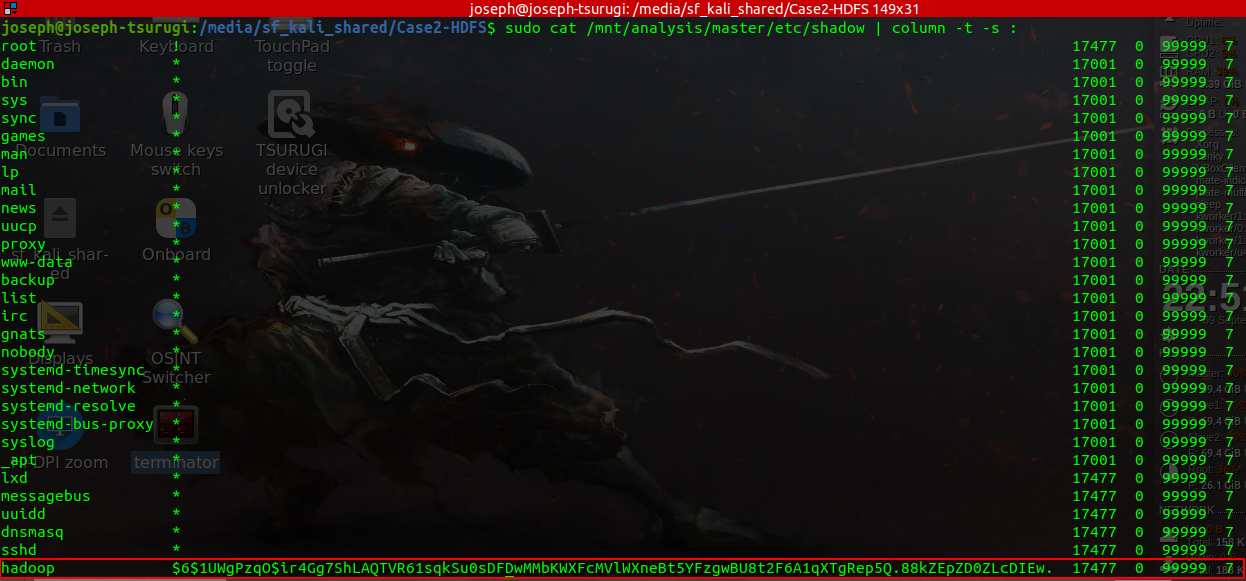
To assess authentication credentials and potential password reuse or cracking opportunities, the /etc/shadow files were examined across the cluster. On the master server, a password hash was present for the hadoop user, indicating that a password had been set for this account.
.
On the slave1 server, password hashes were identified for both the hadoop and hdfs users.

On the slave2 server, a password hash was identified for the hadoop user.

The presence of password hashes for service and administrative accounts (particularly hadoop and hdfs) is highly relevant in HDFS cluster investigations. These findings enable targeted password cracking attempts (if permitted within the investigation scope), help identify shared credentials across nodes, and support timeline correlation with authentication logs. Accounts with both interactive shells and active password hashes represent the highest potential vectors for initial access or lateral movement by threat actors.
To identify users with elevated privileges, the /etc/group files were examined across the master and slave nodes. This file contains group membership information, including the sudo group, which grants administrative (root-level) access via the sudo command.
Analysis of the /etc/group entries focused on the sudo group (and any other privileged groups such as admin or wheel) to determine which accounts possess the ability to execute commands with superuser rights.
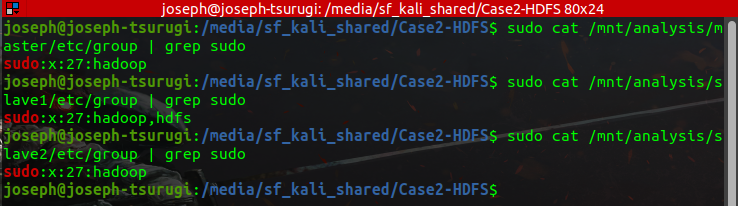
Identifying sudo-enabled accounts is a critical step in HDFS cluster investigations. These accounts are prime targets for privilege escalation by threat actors. Correlating sudo group membership with shell access, password hashes, and authentication logs helps reconstruct potential lateral movement paths and identify accounts that may have been abused during the intrusion.
Since the system was identified as an Ubuntu Linux server, examination of package management artifacts provides valuable insight into the software installation timeline and potential introduction of malicious or unauthorized tools. On Debian-based distributions such as Ubuntu, the dpkg and apt package managers generate detailed logs for every installation, upgrade, or removal activity. The two primary sources reviewed were:
- /var/log/dpkg.log—Records individual package operations performed by the dpkg package manager.
- /var/log/apt/history.log—Provides a higher-level summary of apt command executions, including installed packages, versions, and timestamps.
A truncated excerpt from the dpkg.log file is presented in the figure below.

A truncated excerpt from the apt/history.log file is presented in the figure below.

These logs are essential for reconstructing the system’s software evolution and establishing a reliable timeline of administrative activity. They can reveal:
- When key packages (e.g., Hadoop, Java, SSH, or remote access tools) were installed.
- Potential indicators of compromise, such as installation of suspicious utilities, backdoors, or data exfiltration tools.
- Correlation with user activity, especially actions performed by the hadoop or root accounts.
Reviewing these artifacts helps differentiate between legitimate administrative maintenance and adversarial activity on the HDFS cluster. From the above examinations, weird installations could be noticed. PHP and other accompanying packages were installed at the time of intrusion on October 7, 2019.
Threat actors frequently establish persistence by leveraging native service startup mechanisms. On modern Linux distributions utilizing systemd (such as Ubuntu 16.04), service configuration files are primarily located in the following directories:
- /usr/lib/systemd/system/ — System-provided unit files.
- /etc/systemd/system/ — Administrator or attacker-modified unit files (these take precedence).
Older SysV init or Upstart systems use directories under /etc/init*. During forensic examinations, analysts should scrutinize these locations for recent modifications, anomalous services, or references to suspicious scripts, as attackers may indirectly achieve persistence by altering invoked scripts rather than the primary unit files themselves.

Look through all these files and directories. Examination of the systemd service configurations across the HDFS cluster nodes revealed the following cluster.service unit file:

Further inspection of the directories referenced in the cluster.service unit file led to the discovery of a file named cluster.php. Analysis of its contents confirmed the presence of a PHP webshell. This represents a sophisticated persistence mechanism in which a malicious PHP webshell has been integrated into the systemd service architecture, allowing it to execute automatically on system startup or at regular intervals under the guise of a legitimate cluster-related service.

The deployment of a PHP-based webshell as a systemd-managed service is a notable tradecraft technique. It enables remote command execution and maintains persistent access even across reboots, while blending with legitimate Hadoop cluster operations.
How Did The Adversary Gain Access?
Determining the adversary’s initial access vector is a foundational element of any intrusion investigation. This requires systematic review of relevant authentication and service logs. Given the prevalence of web application attacks, web server logs (e.g., Apache, Nginx) often become a primary focus during DFIR engagements, as they frequently reveal the timing of the breach, source IP addresses, and indicators of the exploit technique employed. Critical system and application logs are conventionally stored under the /var/log/ directory, although on Unix-like systems they may reside in other locations depending on configuration.
The binary log file /var/log/btmp records failed login attempts. Due to its binary format, it must be parsed using the last command (specifically lastb for bad login attempts). Analysis of the btmp log revealed multiple failed login attempts targeting the root account as well as other accounts, including hadoop. All attempts originated from the IP address 192.168.2.129 and occurred on October 6, 2019. This pattern is strongly indicative of a brute-force authentication attack.

The concentration of failed logins from a single internal or adjacent IP address on a specific date provides a critical temporal anchor for the intrusion timeline. This finding directs subsequent analysis toward correlating the brute-force activity with successful logins, web server logs, and any associated webshell or service modifications discovered earlier.
The /var/log/wtmp file maintains a historical record of successful login sessions, logouts, and system reboots. As with btmp, this file is stored in a binary format and must be parsed using the last command to extract human-readable information.

The /var/log/wtmp file maintains a record of successful login sessions, logouts, and system reboots. Like btmp, it is stored in a binary format and must be parsed using the last command. Examination of the wtmp log revealed multiple successful login sessions for the hadoop user, all originating from the same source IP address (192.168.2.129). These logins closely align temporally with the brute-force activity observed in the btmp log.
To develop a more comprehensive understanding of the initial access vector and the precise method of entry, the /var/log/auth.log file was examined. This log contains detailed authentication events, including successful and failed sudo attempts, SSH logins, and other security-relevant activities.

Analysis of the authentication artifacts confirms that the adversary successfully gained initial access to the Master server through valid login credentials. The brute-force attempts observed in the btmp and wtmp logs ultimately succeeded, enabling authenticated access via the hadoop account.
In addition to direct credential attacks, sophisticated adversaries frequently establish persistent access through the following methods:
- Abuse of Service/Application Accounts: Attackers often target locked or under-monitored service accounts (e.g., www-data, mysql, hadoop, or hdfs). By assigning a reusable password to these accounts, they can maintain remote access while minimizing detection.
- SSH Key-Based Backdoors: Another prevalent technique involves appending an attacker-controlled public key to the ~/.ssh/authorized_keys file within a compromised user’s home directory. This grants passwordless SSH access even if the original account password is changed or rotated.

Identifying the precise initial access vector — in this case, a successful brute-force attack — is critical for scoping the intrusion, understanding the adversary’s capabilities, and recommending targeted remediation. Analysts should extend the investigation to examine SSH authorized keys, password policy configurations, and account lockout settings across all cluster nodes to detect additional backdoors or persistence mechanisms.
With the identification of users possessing both sudo privileges and interactive shells (primarily the hadoop account), the next phase involved a detailed examination of their respective home directories. These locations frequently contain critical artifacts such as shell history, SSH keys, user-installed tools, and attacker-dropped binaries.

Analysis of the hadoop user’s home directory on the Master server revealed several items of interest. The most immediately suspicious object was a file named 45010. Execution of the file command against this artifact confirmed it to be an ELF (Executable and Linkable Format) binary—the native executable format for Linux systems.

The presence of an unnamed or obscurely named ELF binary in a privileged user’s home directory is a strong indicator of potential malicious activity. Such files are commonly associated with backdoors, rootkits, data exfiltrators, or cryptocurrency miners deployed by threat actors after gaining initial access.
Further static analysis (e.g., strings extraction, readelf, antivirus scanning, or reverse engineering) of the 45010 binary is warranted to determine its functionality, compile time, and possible command-and-control capabilities.
While the strings command can provide a rapid, high-level overview of embedded ASCII and Unicode artifacts within the executable, a more comprehensive understanding requires full disassembly and reverse engineering. The binary (45010) was loaded into Ghidra for detailed static analysis. After systematically examining all functions, code paths, and cross-references, several notable characteristics were identified.

Disassembling the ELF binary with Ghidra enabled deep inspection of its logic, revealing the true purpose and capabilities of this suspicious artifact. This level of analysis is essential when investigating potentially malicious executables dropped in privileged user directories, as it helps uncover hidden functionality such as command-and-control communication, persistence mechanisms, data exfiltration routines, or anti-analysis techniques that may not be evident through strings extraction alone.
Disassembly and reverse engineering of the suspicious ELF binary (45010) confirmed that it is a kernel exploit used by the adversary to escalate privileges from the hadoop user to root access. The presence of this local privilege escalation tool in the hadoop user’s home directory strongly indicates post-exploitation activity following the initial brute-force compromise.
To uncover additional attacker activity, tactics, techniques, and procedures (TTPs), as well as potential further leads, the command history of the hadoop user was examined. On Linux systems, this is primarily found in the following locations:
- ~/.bash_history (for users with Bash shell)
- Other shell history files depending on the configured shell
sudo cat /mnt/analysis/master/home/hadoop/.bash_history
To confirm whether the adversary extended their access from the Master server to the Slave nodes via SSH, the authentication logs (/var/log/auth.log) on the respective slave servers were examined. Below is the relevant excerpt from the Slave1 server’s auth.log file.
sudo cat /mnt/analysis/slave/var/log/auth.log

Below is the relevant excerpt from the Slave2 server’s auth.log file.

Reviewing auth.log entries across the slave nodes allows analysts to correlate successful SSH logins with the source IP (typically the Master server or the attacker’s pivot point), timestamps, and the target user account (e.g., hadoop). This helps reconstruct the full lateral movement path within the HDFS cluster and identify whether the attacker used the same compromised credentials or established additional persistence mechanisms on the slave nodes.
Examination of the authentication logs across the cluster confirms that the adversary employed SSH for lateral movement from the Master server to the Slave nodes. Specifically, the attacker leveraged the SSH public keys stored in /home/hadoop/.ssh/authorized_keys on the Master server to authenticate successfully to both Slave1 and Slave2.
This key-based authentication allowed passwordless access, a common technique used by adversaries to move stealthily across networked systems after establishing an initial foothold.
To uncover additional attacker activity and potential leads, the Bash command history (.bash_history) for the hadoop user was examined on both Slave1 and Slave2 servers.

The analysis revealed the deletion of the file 45010 from temporary directories on both slave nodes. As previously determined through disassembly, this ELF binary was a local kernel exploit used for privilege escalation.
The digital forensic examination of the compromised HDFS cluster supports the following key findings:
- Initial Access: The adversary compromised the cluster through a successful brute-force attack against weak credentials, specifically targeting the hadoop account.
- Privilege Escalation: Post-exploitation, the attacker deployed the kernel vulnerability CVE-2017-16995 (via the ELF binary 45010) to escalate privileges from the hadoop user to root.
- Persistence: Following privilege escalation, the adversary installed a custom systemd service (cluster.service) that executed a PHP webshell (cluster.php) for persistent remote access.
- Lateral Movement: The attacker utilized SSH key-based authentication (leveraging /home/hadoop/.ssh/authorized_keys from the Master node) to pivot successfully to Slave1 and Slave2.
Post a Comment