

This article aims to introduce readers to Linux system forensics by examining an attacker's Kali Linux machine. The image to be analyzed was provided by Dr. Ali Hadi which was presented at OSDFCon 2019 and was covered as a workshop at the same conference. His website contains the URL for the download location.
The first step is to find out what kind of image file it is. The file command will be run on the image file to determine the file's type. The file command examines a given file, runs several tests, and, based on the particular signature, identifies what kind of file it is. The file command was run against the image file, which revealed that it is an EWF/Expert Witness/EnCase image file format.

Prior to the investigation, I also want to get some fundamental statistics about the file. The stat command is used to determine the file's size, time stamp, and block information as shown below.

If you are analyzing disk images with a Linux forensic workstation,
then the images generally need to be in raw form. Linux wants raw. Common forensic formats such as
E01, AFF, and even split raw are not directly usable by many Linux commands. The first step is to get our E01 image into something that looks like a raw file system. We will use ewfmount from libewf to get a raw representation of the contents of the .E01
image that we can mount for analysis.

The destination directory should appear to contain a raw disk image file that is the same size as the original disk after the ewfmount command has completed. The file is strictly read-only and always has the name ewf1. Now we are ready to analyze our forensic image using the appropriate tools.

The attacker's system has a DOS/MBR partition system, according to the output above. Partition 1 is a Linux Partition with the Ext4 file system and the UUID is 2F925E17-7279-45F8-99B6-7EF241EB45E8. This partition is the bootable partition and is 78 GB in size with 163577856 sectors. Our analysis will be entirely based on this partition.
Further information about the attacker's system geometry can be obtained with the fdisk utility.

The additional information found here is that each sector is 512 bytes in size and the disk identifier is 0x553B71F4. We could also list the partition table from the disk image and obtain information about where each partition starts (sectors) using the mmls utility.

Using the starting sector of Partition 1 (marked above), we can query the details associated with the file system as shown below. The fsstat utility takes an image of a particular file system and displays information about it. It gives details about file system information, meta-data information, content-data information, and the contents in sectors.

We now need to collect information regarding the partition's files and directories. The fls command, which is a component of the Sleuth Kit, displays the names, permissions, and MAC times of all files and folders, even those that have been removed.

Let us go further and create a bodyfile with fls. It's truly an amazing feature that helps
Windows forensic examiners to create timelines of file activity. We added two switches in the command: -r and -m. The first one tells to recurse the directory entries. The second tells it to use mactime input format with the mount point.
sudo fls -r -m "/" -o 2048 /mnt/evidence/ewf1 > bodyfile.txt

Using the mactime utility and our bodyfile, we can now make a timeline of the attacker's system's file activity. These timelines are incredibly helpful in forensic investigations, particularly in cases where malware events have occurred.
mactime -b bodyfile.txt -d > timeline.csv
Again, in the above command, we have two switches that need to be explained. The first one, -b, points to the bodyfile for mactime to use. The second, -d, stands for delimited output and means we can save it as a CSV file and use OpenOffice Spreadsheets to work with it later. Also, if you want to specify the time zone, you can use the -z switch.

The next step is mounting Partition 1, which holds the data having evidentiary value, so we can use standard Linux command-line tools to locate and extract artifacts.

Now all of the files on the root volume can be viewed and processed by pointing to the /mnt/analysis/ directory as seen above. Let us consider the crime case to be solved before delving deeper into forensic analysis.

Forensic Analysis Of The Linux Machine
The examiner will wish to perform a system enumeration of the suspect machine as a first step. Below are specifics regarding the operating system used by the attacker.

The installation date and time of the attacker machine are the next pieces of information we seek to ascertain. The dumpe2fs prints the super block and blocks group information for the filesystem on the device. First, we need to identify the device name of the / partition. Then we run the dumpe2fs command to find out Linux Operating System (OS) Installation Date And Time.

It is important you know the default time zone for the system you are investigating. Linux log files and other important artifacts include timestamps written in the machine's local time zone.

Let's start looking for evil now that we have a clear understanding of the system's fundamental setup.
Since we are dealing with a web server exploit case, the next thing I will want to do here is to search through database logs on the system. These logs are often found in the /var/log directory. There are lots of information to be gleaned from searching through system logs.

Due to the prevalence of web server attacks, you will spend a significant portion of your DFIR career looking through web server logs. The web server logs can show when the breach happened and where the attackers came from. They might also reveal some information regarding the nature of the exploit. Searching the PostgreSQL log revealed the following information - A network listening activity that spans through 2019-09-06 22:45:23 - 2019-09-30 13:02:53 UTC.

The above results provide my answer to the first question. The time range of the exploitation is 2019-09-06 22:45:23 - 2019-09-30 13:02:53 UTC.
This revelation made me want to find out more about the installed programs on the attacker's computer and their last access times.
ls -lt --time=atime /mnt/analysis/var/cache/apt/archives
The result of the above command revealed an interesting pattern. Most of the installed applications were last accessed on September 6 and 7, 2019 - the time of the attack. The NFS server and VNC connection are used, as seen in the figure below. This provides the answer to Question 5.

The figure below confirms the use of the PostgreSQL database management system. This might have been used to issue SQL queries as is typical of web attacks.
The figure below confirms the use of PHP and suggests that the attacker might have loaded some malicious PHP scripts to the target system.

Evidence of potential webshell deployment is revealed in the image below. Web shells are malicious scripts that enable threat actors to compromise web servers and launch additional attacks. Threat actors first penetrate a system or network and then install a web shell. From this point onwards, they use it as a permanent backdoor into the targeted web applications and any connected systems.

The image below reveals Metasploit usage and system network enumeration with Nmap.

Another source that can reveal information about installed applications on the system being investigated is given below.

Viewing the content of the log file highlighted above revealed the following interesting information. The following remote access tools (tigervnc-viewer, nfs-server) were installed after the compromise (2019-09-07 22:48:19) to move within the network and upload malicious files.

Also, I would like to translate the time range of the attack to a list of all modified files on the attacker's system.
find /mnt/analysis/ -newermt "2019-09-06 22:45:23" -not -newermt "2019-09-30 13:02:53" > /media/sf_kali_shared/modified.txt
Accessing /mnt and NFS

Below are files related to other artifacts we have hitherto encountered, including Metasploit, VNC, FTP, and so on. They seem to be hidden.
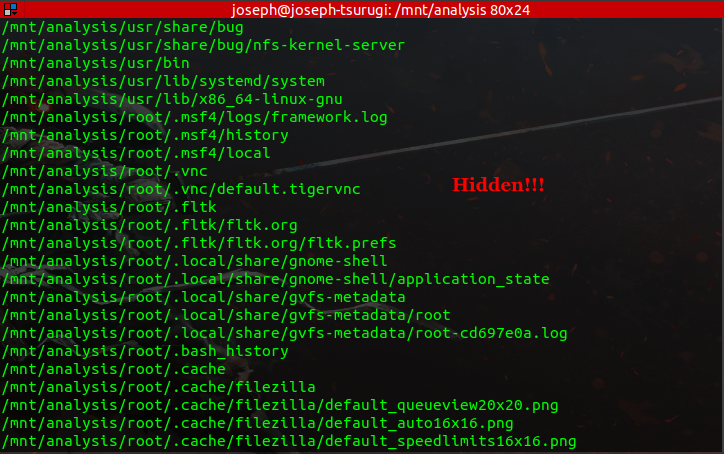
Let us investigate the hidden files associated with the Metasploit Framework. Below is the content of the hidden directory.

The target computer's IP address and the different exploits the attacker tried were revealed by viewing the /.msf4/history file.

The exploits include the following:
- CVE-2011-2523: vsftpd 2.3.4 - Backdoor Command Execution Vulnerability
- CVE-2007-2447: Remote Command Injection Vulnerability - Samba usermap_ script
- CVE-2010-2075: UnrealIRCd 3.2.8.1 Command Execution Vulnerability
- CVE-2010-0094 - Java Runtime Environment Vulnerability
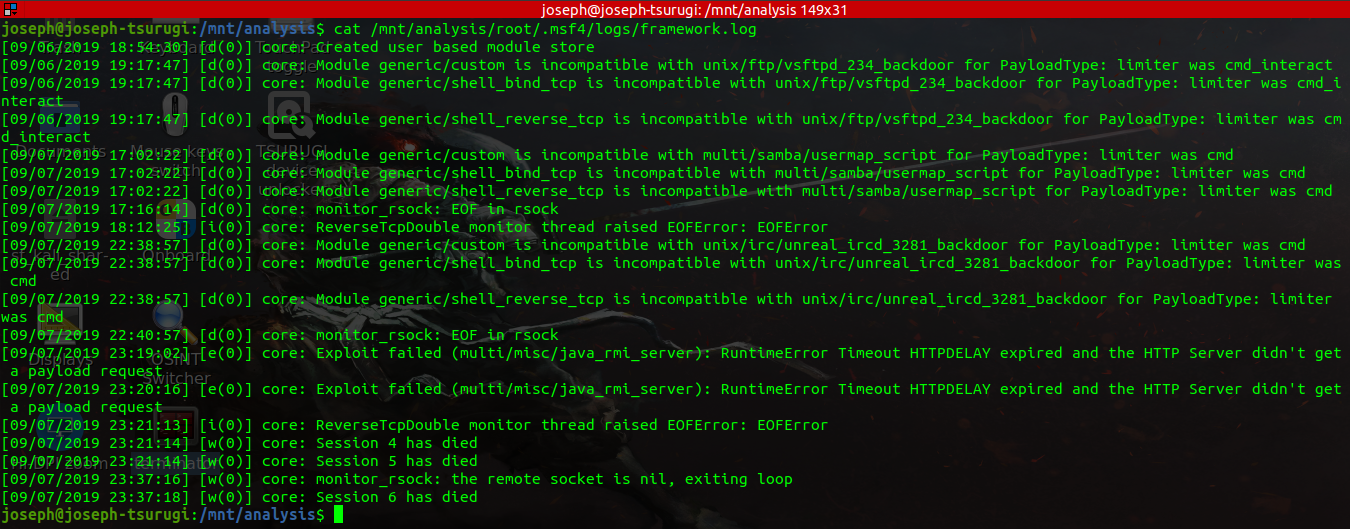
The /.ms4/logs/framework.log file when viewed showed the following. It is clear from the output displayed below that the exploits were unsuccessful.
Let us investigate the hidden files associated with the TigerVNC. Viewing the TigerVNC configuration file reveals the IP address of the victim's server.

Let us investigate the history of commands entered by the attacker.
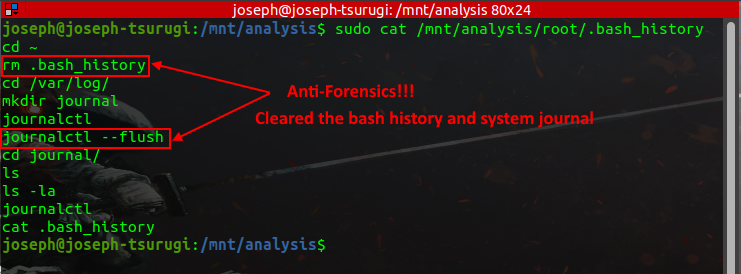
The attacker in an effort to cover his tracks cleared the bash history and system journal. However, evidence of his activities could still be found in the system.
Post a Comment