Digital images, logos, and icons can be of great value in OSINT investigations. This post will identify various photo sharing websites as well as specific search techniques. Later, photo metadata will be explained that can uncover a new level of information including the location where the picture was taken; the make, model, and serial number of the camera; and even a collection of other photos online taken with the same camera. Identifying this information can facilitate actions like surveillance or arrests, which would otherwise be reliant on text-based descriptions. After reading this information, you should question if your online photos should stay online.
Search Engines
Using Search Engines, you can quickly discover visually similar photos from around the web using Reverse Image Searching technology, utilizing content-based image retrieval (CBIR) query techniques. Uploading a photograph from your device or inputting the URL of an image, you can ask a search engine to locate and show you related images used on other websites, either those images that are exactly the same or the same but a different size, or those that contain similar looking items or people.
Using Search Engines, you may be able to identify where an image was taken by recognizing a statue or building in the background that can be identified by the Search Engine. Similarly, Search Engines may be able to locate other images of your subject or logos on sites that identify them.
The first and most important piece of advice on this topic cannot be stressed enough: Google reverse image search is not very good. As at the time of writing this post, the undisputed leader of reverse image search is the Russian site Yandex. After this, the runners-up are Microsoft's Bing, and Google. A fourth service that could also be used in investigations is TinEye, but this site specializes in intellectual property violations and looks for exact duplicates of images.
Google Images
Google is a leading search engine that provides image-based content retrieval for many years, such as Google Lens and Vision AI. Google uses content-based image retrieval (CBIR) techniques to search images with algorithmic models. A user can find similar images using Google image search on this image reverse search utility. I no longer conduct manual searches across the numerous photo sharing sites. Instead, I start with Google Images.
 |
| Figure 1 - Google Image Search |
Google also offers Advanced Image Search, where you can set many criteria of your search query such as image colour, image type (photo, face, clip art, line drawing, animated), region or country, site or domain name, image format type, and usage rights.
Bing Images
In 2014, Bing launched its own reverse image search option titled "Visual Search". While it is not as beneficial as the Google option, it should never be overlooked. On several occasions, I have located valuable pictorial evidence on Bing that was missing from Google results. The function is identical, and you can filter search results by date, size, colour, type, and license type. When searching for relevant data about a target, I try to avoid any filters unless absolutely necessary. In general, we always want more data, not less.
 |
| Figure 2 - Bing Image Search |
Yandex Images
Yandex is a Russian web-based utility to help users find the most relevant images over the World Wide Web. In 2015, Yandex began allowing users to upload an image from their computers. Provide a text-based or visual-based query about the images and this revere search image utility can find images or relevant data.
 |
| Figure 3 - Yandex Image Search |
Yandex is by far the best reverse image search engine, with a scary-powerful ability to recognize faces, landscapes, and objects. This Russian site draws heavily upon user-generated content, such as tourist review sites (e.g. FourSquare and TripAdvisor) and social networks (e.g. dating sites), for remarkably accurate results with facial and landscape recognition queries.
Its strengths lie in photographs taken in a European or former-Soviet context. While photographs from North America, Africa, and other places may still return useful results on Yandex, you may find yourself frustrated by scrolling through results mostly from Russia, Ukraine, and eastern Europe rather than the country of your target images.
The facial recognition algorithms used by Yandex are shockingly good. Not only will Yandex look for photographs that look similar to the one that has a face in it, but it will also look for other photographs of the same person (determined through matching facial similarities) with completely different lighting, background colours, and positions. While Google and Bing may just look for other photographs showing a person with similar clothes and general facial features, Yandex will search for those matches, and also other photographs of a facial match.
TinEye
TinEye is another site that will perform a reverse image analysis. These results tend to focus on exact duplicate images. The results here are usually fewer than those found with Google. Since each service often finds images the others do not, all should be searched when using this technique.
Other Reverse Image Search Services
PimEyes
This is another reverse-image service, but with an important unique characteristic. This service attempts to use facial recognition to find matches, and does not rely on pixel analysis as most other sites do. It also places emphasis on faces instead of the overall image.
Karma Decay
It is a reverse image search engine that only provides positive results that appear on the website Reddit. It was originally launched as a way for users to identify when someone reposted a photo that had previously been posted on the website. The user could then "down-vote" the submission and have it removed from the front page. We can use this in investigations to locate every copy of an individual photo on Reddit. You can choose to upload the image from your computer, enter the URL where the image was found, or the URL of the Reddit page where the image was seen to determine if it is being shared in other subreddits.
Wolfram Image Identification Project
The goal of this service is to identify the content of an image. If you upload a photo of a car, it will likely tell you the make, year, and model. An upload of an image containing an unknown Chinese word may display a translation and history details. The site prompts you to upload a digital file from your computer, but you can also drag and drop an image from within a web page in another tab.
Pictriev
Pictriev is a service that will analyze a photo including a human face and try to locate additional images of the person. The results are best when the image is of a public figure with a large internet presence, but it will work on lesser-known subjects as well. An additional feature is a prediction of the sex of the target as well as age.
Photo Sharing Sites
Flickr
Flickr, purchased by Yahoo and now owned by SmugMug, was one of the most popular photo-sharing sites on the internet. Many have abandoned it for Twitter and Instagram, but the mass number of images cannot be ignored. The majority of these images are uploaded by amateur photographers and contain little intelligence to an investigator. Yet there are still many images in this "haystack" that will prove to be beneficial to the online researcher. The main website allows for a general search by topic, location, username, real name, or keyword. This search term should be as specific as possible to avoid numerous results. An online username will often take you to that user's Flickr photo album. After you have found either an individual photo, user's photo album, or group of photos by interest, you can begin to analyze the profile data of your target. This may include a username, camera information, and interests. Clicking through the various photos may produce user comments, responses by other users, and location data about the photo. Dissecting and documenting this data can assist with future searches. The actual image of these photos may give all of the intelligence desired, but the data does not stop there.
Flickr Map
Flickr attempts to geo locate all of the photos that it can. It attempts to identify the location where the photo was taken. It will usually obtain this information from the Exif data, which will be discussed in a moment. It can also tag these photos based on user provided information. Flickr provides a mapping feature that will attempt to populate a map based on your search parameters. I believe this service is only helpful when you are investigating a past incident at a large event or researching the physical layout of a popular attraction.
Flickr API
There are three specific uses of the Flickr Application Programming Interface (API) that I have found helpful during many online investigations. The first queries an email address and identifies any Flickr accounts associated with it. The second queries a username, and identifies the Flickr user number of the connected account. The final option queries a Flickr user number and identifies the attached username. Unfortunately, all of these features require a Flickr API key. Simply request your own free key here.
A demonstration may help to explain the features. First, I submitted the following URL to Flickr in order to query my target email address of meetjosephmoronwi@gmail.com. Simply replace my API key with your own in the code below.
https://api.flickr.com/services/rest/?method=flickr.people.findByEmail&api_key=27c196593dad58382fc4912b00cf1194&find_email=meetjosephmoronwi@gmail.com
I received the following result from the search query.
<rsp stat="ok">
<user id="196094847@N05" nsid="196094847@N05">
<username>JoseffMoro</username>
</user>
</rsp>
I now know that my target possesses a Flickr account associated with the email address, the username for the account, and the unique user number which will never change. Next, assume that we only knew the username. The following URL could be submitted.
https://api.flickr.com/services/rest/?method=flickr.people.findByUsername&api_key=27c196593dad58382fc4912b00cf1194&username=JoseffMoro
Assume that we only knew the username. The following URL could be submitted.
https://api.flickr.com/services/rest/?method=flickr.people.getinfo&api_key=27c196593dad58382fc4912b00cf1194&user_id=196094847@N05
This returns the most details, including the following result from our target.
<rsp stat="ok">
<person id="196094847@N05" nsid="196094847@N05" ispro="0" is_deleted="0" iconserver="0" iconfarm="0" path_alias="" has_stats="0" has_adfree="0" has_free_standard_shipping="0" has_free_educational_resources="0">
<username>JoseffMoro</username>
<realname>Joseph Moronwi</realname>
<location/>
<description/>
<photosurl>https://www.flickr.com/photos/196094847@N05/</photosurl>
<profileurl>https://www.flickr.com/people/196094847@N05/</profileurl>
<mobileurl>https://m.flickr.com/photostream.gne?id=196089507</mobileurl>
<photos>
<count>0</count>
</photos>
</person>
</rsp>
Navigating to the profile displays details such as the join date, followers, and photo albums. This may seem like a lot of work for a minimal number of details, but this is quite beneficial. There is no native email address search on Flickr, but we can replicate the function within the APL You may not find young targets sharing images here, but the massive collection of photos spanning the past decade may present new evidence which was long forgotten by the target.
Exif Data
Exchangeable Image File Format (EXIF) is a standard that defines specific information related to an image or other media captured by a digital camera. It is capable of storing such important data as camera exposure, date/time the image was captured, and even GPS location.
This data, which is embedded into each photo "behind the scenes", is not visible by viewing the captured image. You need an Exif reader, which can be found on websites and within applications. Keep in mind that some websites remove or "scrub" this data before being stored on their servers. Facebook, for example, removes the data while Flickr does not. Locating a digital photo online will not always present this data. If you locate an image that appears full size and uncompressed, you will likely still have the data intact. If the image has been compressed to a smaller file size, this data is often lost. Any images removed directly from a digital camera card will always have the data. This is one of the reasons you will always want to identify the largest version of an image when searching online. The quickest way to see the information is through an online viewer.
There are a variety of browser based tools that make extracting EXIF data simple. For Firefox there’s Exif Viewer, and for Chrome there’s Exif Viewer Pro. If you prefer to use a website-based tool to do this then I recommend Jeffrey’s EXIF viewer (unavailable at the moment of writing this post but should be monitored for when it will become available) or the excellent Forensically. Both of these sites allow you to upload an image and view the EXIF data in your browser. For working offline there’s also the powerful Exiftool command line program.
Camera Trace
This site was designed to help camera theft victims with locating their camera if it is being used by the thief online. For that use, you would find a photo taken with the stolen camera, and drop it into the previous site for analysis. This analysis identifies a serial number if available. If one is located, type the serial number into Camera Trace. It will attempt to locate any online photographs taken with the camera. This service claims to have indexed all of Flickr and 500px with plans to add others. A sample search using a serial number of "123" revealed several results. The website urges users to sign up for a premium service that will make contact if any more images appear in the database, but I have never needed this.
Online Barcode Reader
Barcodes have been around for decades. They are the vertical lined images printed on various products that allow registers to identify the product and price. Today's barcodes are much more advanced and can contain a large amount of text data within a small image. Some newer barcodes exist in order to allow individuals to scan them with a cell phone. The images can provide a link to a website, instructions for downloading a program, or a secret text message. I generally advise against scanning any unknown barcodes with a mobile device since malicious links could be opened unknowingly. However, an online barcode reader can be used to identify what information is hiding behind these interesting images.
Additional barcode identification options are as follows.
Image Manipulation
It is common to find images on the internet that have been manipulated using software such as Photoshop. Often it is difficult, if not impossible, to tell if these photos have been manipulated by visually analyzing them. A handful of websites use a technique to determine not only if the photo has been manipulated, but which portions of the photo have changed.
Foto Forensics
This site allows you to upload a digital image. After successful upload, it will display the image in normal view. Below this image will be a darkened duplicate image. Any highlighted areas of the image indicate a possible manipulation. While this site should never be used to definitively state that an image is untouched or manipulated, investigators may want to conduct an analysis for intelligence purposes only.
This site will provide an analysis of an image from the internet or a file uploaded from a computer. It is important to note that any images uploaded become part of the website's collection and a direct URL is issued. While it would be difficult for someone to locate the URL of the images, it could still pose a security risk for sensitive photographs.
Forensically
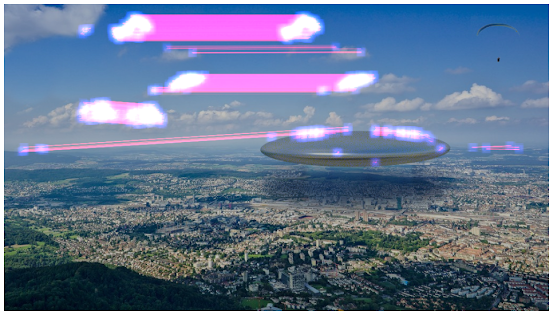
Forensically is a robust image analyzer that offers a huge collection of photo forensic tools that can be applied to any uploaded image. This type of analysis can be vital when image manipulation is suspected. Previous tools have offered one or two of the services that Forensically offers, but this new option is an all-in-one solution for image analysis. Loading the page will present a demo image, which is used for this explanation. Clicking the "Open File" link on the upper left will allow upload of an image into your browser for analysis. Images are NOT uploaded to the server of this tool; they are only brought into your browser locally. Figure 21 .11 (left) is the standard view of a digital photo. The various options within Forensically are each explained, and example images are included.
The Magnifier allows you to see small hidden details in an image. It does this by magnifying the size of the pixels and the contrast within the window. There are three different enhancements available at the moment: Histogram Equalization, Auto Contrast, and Auto Contrast by Channel. Auto Contrast mostly keeps the colours intact; the others can cause colour shifts. Histogram Equalization is the most robust option. You can also set this to none.
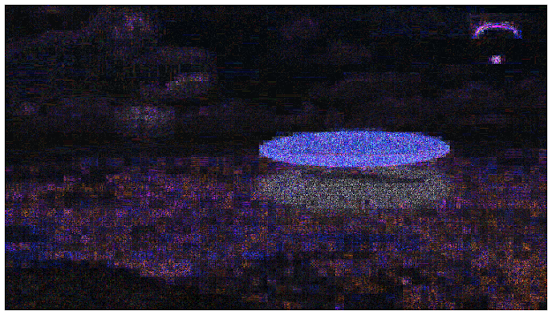
The Clone Detector highlights copied regions within an image. These can be a good indicator that a picture has been manipulated. Minimal Similarity determines how similar the cloned pixels need to be to the original. Minimal Detail controls how much detail an area needs; therefore, blocks with less detail than this are not considered when searching for clones. Minimal Cluster Size determines how many clones of a similar region need to be found in order for them to show up as results. Blocksize determines how big the blocks used for the clone detection are. You generally don't want to touch this. Maximal Image Size is the maximal width or height of the image used to perform the clone search. Bigger images take longer to analyze. Show Quantized Image shows the image after it has been compressed. This can be useful to tweak Minimal Similarity and Minimal Detail. Blocks that have been rejected because they do not have enough detail show up as black. Figure 4(b) below demonstrates this output.
 |
| Figure 4(a) - normal image view |
 |
| Figure 4(b) - clone detector view |
Error Level Analysis compares the original image to a recompressed version. This can make manipulated regions stand out in various ways. For example, they can be darker or brighter than similar regions which have not been manipulated. JPEG Quality should match the original quality of the image that has been photoshopped. Error Scale makes the differences between the original and the recompressed image bigger. Magnifier Enhancement offers different enhancements: Histogram Equalization, Auto Contrast, and Auto Contrast by Channel. Auto Contrast mostly keeps the colours intact; the others can cause colour shifts. Histogram Equalization is the most robust option. You can also set this to none. Opacity displays the opacity of the Differences layer. If you lower it you will see more of the original image. Figure 5 below displays manipulation.
 |
| Figure 5 - Error Level Analysis |
Noise Analysis is basically a reverse de-noising algorithm. Rather than removing the noise it removes the rest of the image. It is using a super simple separable median filter to isolate the noise. It can be useful for identifying manipulations to the image like airbrushing, deformations, warping, and perspective corrected cloning. It works best on high quality images. Smaller images tend to contain too little information for this to work. Noise Amplitude makes the noise brighter. Equalize Histogram applies histogram equalization to the noise. This can reveal things but it can also hide them. You should try both histogram equalization and scale to analyze the noise. Magnifier Enhancement offers three different enhancements: Histogram Equalization, Auto Contrast, and Auto Contrast by Channel. Auto Contrast mostly keeps the colours intact; the others can cause colour shifts. Histogram Equalization is the most robust option. You can also set this to none. Opacity is the opacity of the noise layer. If you lower it you will see more of the original image. The result can be seen in Figure 6 below.
 |
| Figure 6 - Noise Analysis |
Level Sweep allows you to quickly sweep through the histogram of an image. It magnifies the contrast of certain brightness levels. To use this tool simply move your mouse over the image and scroll with your mouse wheel. Look for interesting discontinuities in the image. Sweep is the position in the histogram to be inspected. You can quickly change this parameter by using the mouse wheel while hovering over the image, this allows you to sweep through the histogram. Width is the number of values (or width of the slice of the histogram) to be inspected. The default should be fine. Opacity is the opacity of the sweep layer. If you lower it you will see more of the original image.
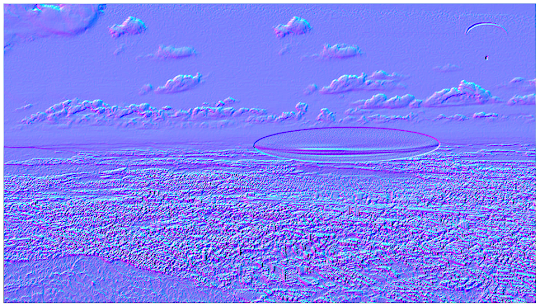
Luminance Gradient analyzes the changes in brightness along the x and y axis of the image. Its obvious use is to look at how different parts of the image are illuminated in order to find anomalies. Parts of the image which are at a similar angle (to the light source) and under similar illumination should have a similar colour. Another use is to check edges. Similar edges should have similar gradients. If the gradients at one edge are significantly sharper than the rest it's a sign that the image could have been copied and pasted. It does also reveal noise and compression artifacts quite well.
 |
| Figure 7 - Luminance Gradient Analysis |
PCA performs principal component analysis on the image. This provides a different angle to view the image data which makes discovering certain manipulations and details easier. This tool is currently single threaded and quite slow when running on big images. Choose one of the following Modes: Projection of the value in the image onto the principal component; Difference between the input and the closest point on the selected principal component; Distance between the input and the closest point on the selected principal component; or the closest point on the selected principal Component. There are three different enhancements available: Histogram Equalization, Auto Contrast, and Auto Contrast by Channel. Auto Contrast mostly keeps the colours intact; the others can cause colour shifts. Histogram Equalization is the most robust option. You can also set this to none. Opacity is the opacity of the sweep layer. If you lower it you will see more of the original image.
 |
| Figure 8 - PCA Analysis |
MetaData displays any Exif metadata in the image. Geo Tags shows the GPS location where the image was taken, if it is stored in the image. A truncated output is shown below.
 |
| Figure 9 - Metadata analysis |
The next time you identify a digital image as part of your online investigation, these tools will peek behind the scenes and may display evidence of tampering.
There are specialized sites that hold images that have appeared in the press and news media. To search for this type of images, try these sites:
- Gettyimages
- Instant Logo Search
- Reuters Pictures
- News Press
- Associated Press Images Portal
- PA Images
- European Pressphoto Agency
- Canadian Press Images Archive

Post a Comment